Chapter 3: Creating Purchase Orders
In GEP QUANTUM, purchase orders are created in three ways; of which in the first two scenarios, they are created automatically, and then there is a manual way to create an order. In the automated process, once the document is created, the rest of the process remains the same as in the manual one.
-
Create Catalog > Requisition, and then it flips into the Order document automatically.
-
Create Requisition. Once the requisition moves into the Ordered state à it flips into the Order document automatically.
-
Once you receive the requirements from the Supplier, you can create the order document manually by clicking Create > Purchase Order from the left navigation pane.
In this section, you will learn the manual process in detail, as the first two processes are explained in the Requisition User Manual.
3.1 Creating Order
You must have the Create Order activity to create an order. You can create multiple purchase orders from a single purchase requisition based on the Segregate Requisition setting value. This feature is governed by the setting Allow Multi PO Creation. The default value is false. As an Admin, you can access the Segregate Requisition setting by navigating to Setup & Administration > Setup > Features and Configurations > Requisition. The Create Purchase Order button appears for requisitions in Open and Partially Ordered statuses.
The document shows Summary Cards at the top to provide visibility into key metrics related to the document. These cards are contextual, and the values are updated based on the status of the document.
The document also shows a stepper to provide visibility into the status of the items. You can now infer the delivery or payment status without analyzing each item.
To create an order manually:
-
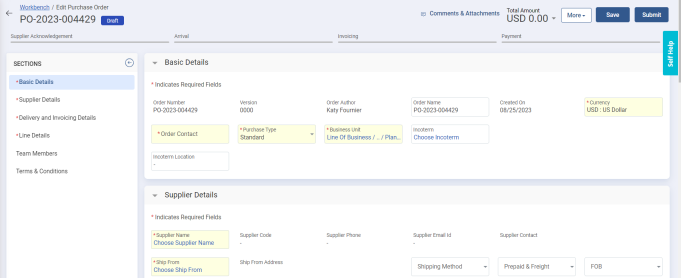
From the left navigation pane, click Create à Purchase Order. The Edit Purchase Order page opens with all sections on the left side and section details on the right side.
-
In all the sections, fill the details in all the mandatory and optional fields.
-
Click Save.
3.2 Updating Order Details
The PO in Draft state opens with the following sections, where you must fill in the information in all the mandatory fields and optional fields if needed:
-
Basic Details
-
Supplier Details
-
Delivery and Invoicing Details
-
Line Details
-
Notes and Attachments
-
Terms and Conditions
-
Team Members
-
New Terms & Condition
If an order is flipped from a Catalog or a Requisition, most of the fields in each section will be auto-populated. However, you can still update certain fields in each section. If you are creating a purchase order manually, then you will have to enter information in all the required fields.
The Order details page shows the summary of the order as highlights above the Basic Details section. This summary appears for the order in all the statuses except for the Draft status. They are updated on real-time basis and configured based on the document status.

|
Document Status |
Important Pointers |
|---|---|
|
Pending Approval |
Average Orders by Buyer means number of orders placed by the Order Author in a month. |
|
Open |
Pending Since: [Number] means number of days since Order Status changed to Open.
Multi-Shipping Location: [Yes/No] means Yes indicates that more than one Ship to Location on Order and No indicates that single Ship to Location on Order. |
|
Accepted / Partially Accepted |
Items Delayed: [Number] Applicable only for Material Lines means Number of items not received beyond the "Need by Date". Items Rejected: [Number] means Received Quantity - Accepted Quantity. Items Pending Delivery: [Number] means Ordered Quantity - Accepted Quantity. Payment Pending: [Amount] means Document Subtotal - Document Invoiced Amount Total. Order Age: [No. of days] means number of days post Order creation. Supplier Response Time: [No. of days] means number of days between Order status transitioned from Open to (Accepted or Supplier Rejected or Partially Accepted). Consumed Amount: [Currency Amount] only for Service lines means Order Received Amount. Amount Pending: [Currency Amount] Service lines means Order Subtotal - Order Received Amount. |
|
Closed |
Order Consumption: [Percentage] means Total Invoiced Amount / Order total Supplier Response Time: [Number of Days] |
3.2.1 Adding Basic Details
In this section, you must enter the basic details of your order. Some of the fields are auto-populated.
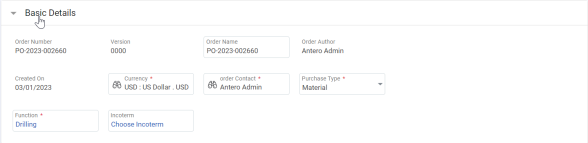
You must enter the information in the following mandatory fields:
|
Field |
Description |
|---|---|
|
Currency |
Select the currency applicable for this order. |
|
Order Contact |
Select the order contact for this order. |
|
Purchase Type |
Select the appropriate purchase type for this order. The options are populated from Global Codes. Based on your configuration, the options may differ. If there are only Material and Service options, then on selecting an option you will be able to add only related lines. For example, if you select Material, then you can only add material-based lines in the Line & Accounting Details section. |
|
Function |
Select the organization function to which this order belongs. |
|
Incoterm |
Select the Incoterm (International Commercial Terms) for the shipping. |
3.2.2 Adding Supplier Details
In this section, you must add the supplier details for whom you are creating this order.
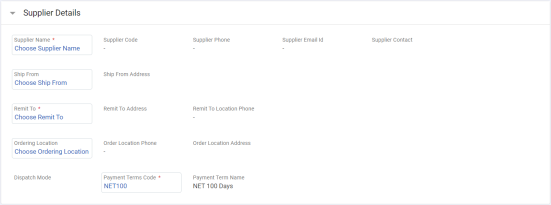
You must enter the information in the following mandatory fields:
|
Field |
Description |
|---|---|
|
Supplier Name |
Select the name of the supplier for whom you are creating this order. |
|
Ship From |
Select the location from where the order items will be shipped. |
|
Remit To |
Select the location where the payment will be made. |
|
Ordering Location |
Select the location of the Supplier. |
|
Payment Terms Code |
Select the payment term for the order based on which the payments will be made. |
3.2.3 Adding Delivery and Invoicing Details
In this section, you must enter the delivery and invoicing details of the Supplier for whom you are creating this order.

You must enter the information in the following mandatory fields:
|
Field |
Description |
|---|---|
|
Ship To |
Select the shipping location to whom the order is shipped. |
|
Ad hoc Ship To |
Select the ad hoc shipping location to whom the order is shipped. |
|
Bill To |
Select the billing location to whom this order will be billed. |
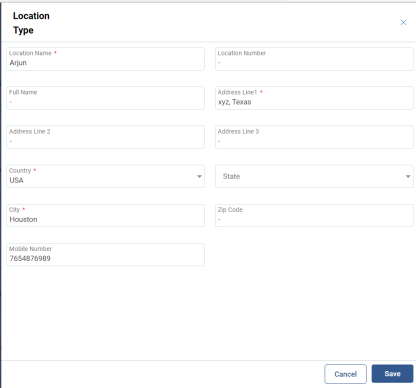
To add Ad hoc Ship To members:
-
Click Add. The Location Type slider opens.
-
In the Location Name field, enter a valid location name for the ad hoc shipping.
-
In the Address Line1 field, enter a valid address for the ad hoc shipping.
-
In the Country field, select the country for which ad hoc shipping is to be done.
-
In the City field, enter the name of the city.
-
In the Mobile Number field, enter a valid number to contact for ad hoc shipping.
-
Click Save The ad hoc ship to appears in the field.
3.2.4 Adding Line & Accounting Details
In this section, you will add the items requested by the Supplier.
If the purchase order is flipped from a catalog or a requisition, this section auto-populates the lines. However, you can still add more items if required. In manual creation, you must add the items from the catalog and enter the corresponding information.
Note: The amount values appear in the base currency set up for the domain. It is governed by the setting.
-
Setting Name: Currency Conversion Date
-
Possible Values: True/False
-
Required Value: True
-
Default Value: False
To add lines:
-
Click Add. A line appears in the grid below.
-
In the Item Name column, add the item.
-
In the Supplier Item Number column, add the supplier’s item number associated with the item. Notice the Line Type is read-only because of the selected purchase type in the Basic Details section, and you will not be able to change it to another type.
-
In the Unit Price column, enter the number of items. For the Special Buy purchase type orders, this field is editable and not fetched from the Price Master (unlike other purchase type). You can provide Supplier suggested Unit Price along with the Promise Date and Promise Quantity during PO Confirmation.
-
In the Quantity column, enter the number of items to order.
-
From the UOM column, select the unit for measurement for the selected item.
-
The Category column is auto populated based on the category mapped with your user profile. However, you can still edit it.
-
In the Need By Date column, select the date by when you would like to receive the item.
-
In the Taxes column, enter the tax number in % in the selected country. Click Add Taxes and enter tax code to get the tax amount. You can decide if you want to add freight and other charges to their tax base or not. You can also exempt taxes by clicking the Exempt button. The calculated taxes are displayed at the line grid under the Taxes column.
-
In the Other Charges column, enter the other charges for the shipping. Click the Add button to include Surcharges and Discounts at the line level. The final amount appears at the line grid in a clickable format based on the selected other charges.
-
In the Freight column, enter the freight charges for the shipping.
-
In the Ship To column, enter the shipping name of the buyer.
-
In the Deliver To column, enter the name whom the order is to be delivered.
-
In the Shipping Method column, select the shipping method.
-
In the Contract Number column, select the contract number.
-
In the Contract Name column, enter the name of the contractor.
-
In the Fulfilment Document Type, select the desired value. The options are No Fulfillment, Goods Receipt, and Service Confirmation. You can default this column on the Order document based on configured parameters.
-
In the Manufacturer Name column, enter the name of the manufacturer.
-
In the Manufacturer Number column, enter the number of the manufacturer.
-
In the Manufacturer Model Number column, enter the model number of the manufacturer.
-
In the Closed for Receiving column, select yes/no for receiving the GR.
-
In the Closed for Invoicing column, select yes/no for not receiving the GR for invoicing.
-
From the Match Type column, select either 2-way or 3-way. This is useful when you create an invoice so that the invoiced items are compared between Receipt, Invoice, and the Order based on the selected value. If its 2-way, the comparison occurs between invoice and order document. If its 3-way, it occurs between receipt, invoice, and order document.
-
To add more lines, click Add and repeat the above steps.
-
To duplicate a certain line, select the line and click Duplicate. The duplicated line appears. You can make any changes to that line if needed.
-
To delete any line if it was mistakenly created or no longer needed, select the line, and click Delete.
-
Click Yes to confirm the action. The line is deleted.
-
-
To select and add the applicable taxes to the item or default the taxes, click Add Taxes under the Taxes column.
-
To add multiple types of other charges like Freight, Discount, Insurance, Surcharge, Miscellaneous Charges, etc, click Add under the Other Charges column.
Once you have added all the lines, if you want to make any common changes to the lines, you can use the Apply to All functionality. When the supplier invoice is submitted, incremental values should be passed instead of aggregated value.
To edit multiple lines:
-
Click Apply to All. The Edit Multiple Lines slider opens.
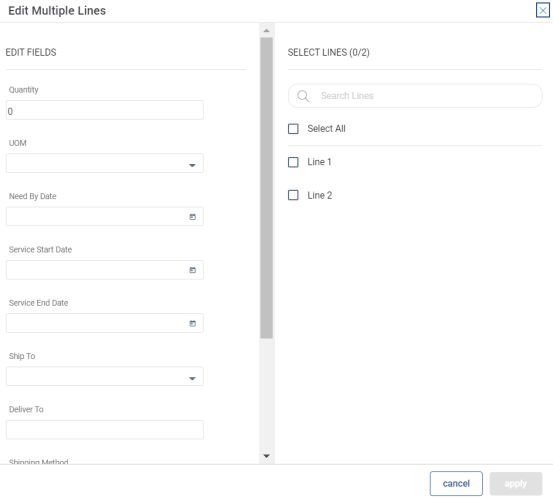
-
In the right pane, select the lines to make the changes.
-
In the left pane, make the necessary changes to the fields. Make the changes carefully, as those will apply to all the selected lines.
-
Once you are done, click Apply.
-
Click Yes to confirm your action. The changes are applied to the selected lines.
Once you have added your items to the order, you must mention the accounting details for the same in the Accounting tab. In this tab, you can do the following:
-
Click Quantity in the Split Type column to split the item based on percent or quantity.
-
From the Cost Center, Billing Category Code, and AFE dropdown list, select the option where you want these items to be accounted to. These fields show values based on the Organization Structure master data in Common Master Data.
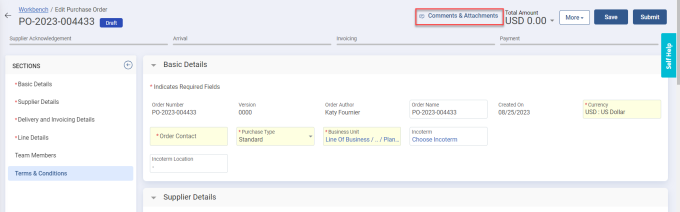
3.2.5 Adding Comments and Attachments
In this section, you will add private and external comments and attachments visible to the Buyer and Supplier, respectively.
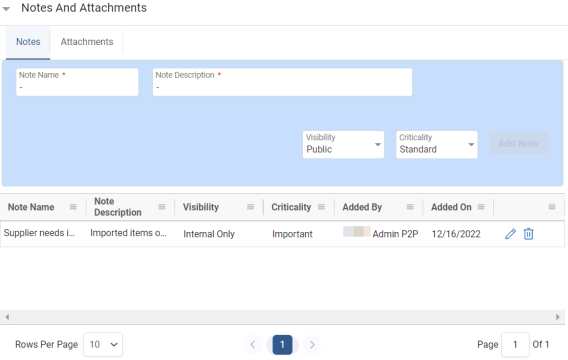
To add a note:
-
In the Comments a field, enter a valid name for the note.
-
In the Note Description field, enter a valid description for the note.
-
From the Visibility dropdown list, select Public to display the note for everyone, including Suppliers, or select Internal Only to display it to Buyer.
-
From the Criticality dropdown list, select either Standard or Important.
-
Click Add Note. The note appears in the below grid. You can also edit and delete the note.
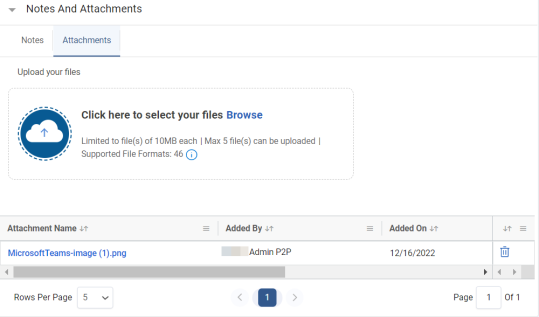
To add an attachment:
-
Click the Attachments tab.
-
Click Browse to locate and select the file. The upload begins.
-
Once the file is uploaded successfully, click Done. If you want to cancel the upload, click
 . The attachment appears in the grid. You can do the following on the attachment:
-
Select the Shared Externally check box to share the corresponding attachment with the Suppliers.
-
If you want to delete the attachment, click
.
-
3.2.6 Viewing Terms and Conditions
In this section, you will view the terms and conditions added in the Order Terms and Conditions P2P Master Data. The terms are conditions are added automatically based on the Function, Category (Line Details), and Document Type from the order document.
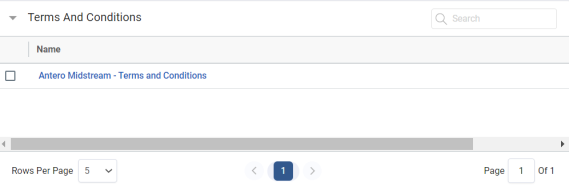
If there are multiple records, use the Search box to search for the required record.
To view the content, click the name.
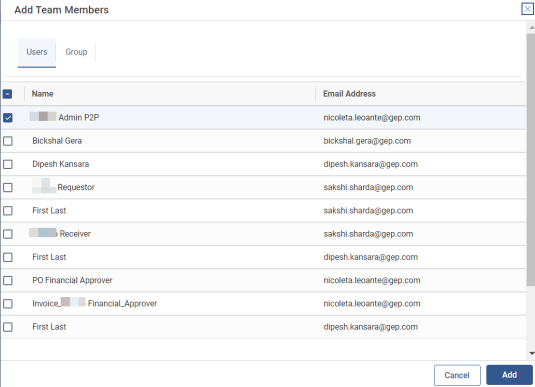
3.2.7 Adding Team Members
In this section, you can add additional team members who can be viewers and/or co-authors for this order. By default, this section displays the order author’s name.
If there are many members, use the Search box to find the required member.
To add team members:
-
Click Add. The Add Team Members slider opens.
-
Select the desired users.
-
Click Add.
-
Click OK. The team member appears in the below grid. Notice that the new member, by default, has Viewer access. You can also select the Co-author checkbox to grant co-author access to the team member.
3.2.8 Adding New Terms & Conditions
In this section, if the terms and conditions are not defaulted on the Order document then this section will be visible. In this section, you can add customized terms and conditions pre negotiated between Buyer and Supplier for long term contract.
To add a terms and conditions:
-
Click Add. The Add New Terms & Conditions slider opens.
-
In the Terms and Conditions name field, enter a valid name for the terms and conditions.
-
In the Description field, enter a valid description for the terms and conditions.
-
Click Add.
-
Click OK. The new terms and conditions are added in the grid.
To add from repository:
-
Click Add From Repository. The Add From Repository page opens.
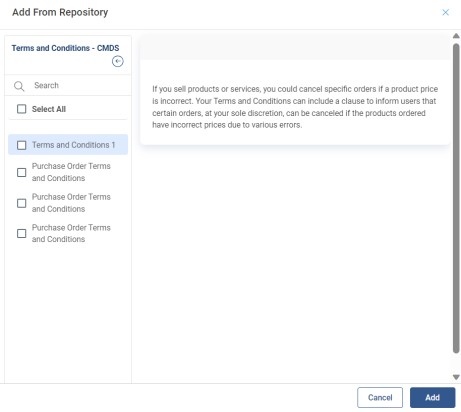
-
Select the existing terms and conditions from the CMDS.
-
Click Add. The terms and conditions are added to the section.
To download and upload from a template:
-
Click Download Template. The template is downloaded.
-
Save and open the template.
-
Make the necessary changes to the document.
-
Click Upload Terms and Conditions to upload the updated file.
-
Browse and locate the file.
-
Click Add. The terms and conditions are uploaded in the section.